


Wall Hanging DIY
Lately, I’ve had a real hankering for projects that get me away from my desk and computer. I’ve also been on the lookout for something unique and textural to occupy the wall space between our two bedroom windows, so when I came upon this DIY via the blog Homey Oh My (aka DIY mecca) I knew I had to give it a try. After making a few personal amendments to the look and feel, I decided to try out my very first multi-media wall art project. I won’t lie, the project required more planning and time to complete than I’d initially anticipated but the result was well worth the effort. I made sure to document the process and wanted to share the steps I took to make this simple but striking wall hanging. So here goes!

Supplies
- Wall hook
- 7 Wooden beads (1 in.)
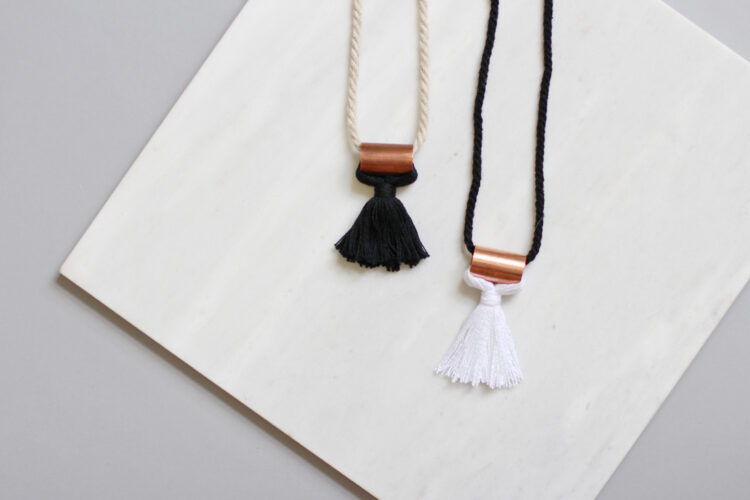
- 22″ Copper Tube + 2 copper caps
- 1 Skein Chunky Wool (I used a super soft alpaca wool)
- 1 Skein Black Wool
- Sharp scissors
- Black Sharpie
- Ruler
- Hardcover book (for making the tassels)
- Paper clip (to help thread the beads)
- Glue gun (to secure beads and copper caps)

Making the Tassels
1. Cut a piece of black wool approx. 7″ (length of the book spine)
2. Hold the single piece on the book spine and wrap a continuous piece of wool around the book about 30+ times. Then tie the single piece in a double knot.
3. Cut the wool on the side opposite the spine.
4. Cut another single piece of wool and tie it around the wool bundle about 1 inch below the top knot.
5. Repeat 10 times. I know it seems like a lot but it gets faster and it actually really fun!


Hanging the Beads and Tassels
6. After you’ve secured the copper caps on the tubing and attached some wool to hang it from, cut 7 long strips of black wool (minimum of approx. 34″ when doubled) and double knot to fasten onto copper rod. Space them out evenly.
7. Position one wooden bead on each piece of string in an arrow shape. I went with 4″, 7″, 10″ and 13″ from the bar and used a straightened paper clip to feed the string through.
8. Tie a double knot where the bead will sit and using a dab of hot glue secure the bead in place.
9. Tie the tassels into place on each string using the extra yarn from the top and 1″ down. Trim all the excess yarn.

Adding the Chunky Wool
10. Start tying the thicker wool to the copper bar between the black wool. Approx. 16 strips per section.
11. Keep pieces long enough for them to be trimmed on an angle between wooden beads.
12. I switched gears at this point and decided to colour the beads black with a sharpie. You can decide to either leave them natural or colour them before they’ve been glued into place 😉
13. Regardless, it’s now time to trim the chunky wool on an angle between the beads.

14. If you haven’t already, go ahead and hang your masterpiece somewhere for all to see!


I love the bohemian vibe this piece gives our otherwise minimal bedroom (see the full space here). It’s also a great focal point from the stairway landing too, which makes the room much more exciting than a plain white wall did.
So what do you think? Dare to give it a try? I promise it’s a lot of fun and totally worth the time it takes to pull off!
I picked up the yarn from a local knitting shop, the beads, glue gun and sharpie from the art store and the wall hook, copper tube and caps from Home Depot.


AMAZING! Gonna try! Hope it will look incredible as yours.
Where did you get the copper rod at?
Home Depot. Lots of options in the plumbing dept.
This is beautiful! Looks so professional. I want to see a picture of it up in your lovely bedroom.
Thanks so much Jodie! I’m so glad I tried it out. The last photo shows it on the bedroom wall but I was too short on time to show it in full context. XO